Digital Recreation of a 1950s era Tupolev Tu-104
- ehrenallie
- Apr 12, 2023
- 17 min read

(Hirsh, 2011)
You can download the full paper here!
An in-depth workflow of a 3D digital recreation of a 1950s era Tupolev Tu-104 bomber jetliner through limited data sources. The objective was to artistically capture a 3D representation of a deteriorated interior while preserving the historical significance of an antiquated piece of aerospace history. I demonstrate the workflow used while following a traditional animation pipeline to capture a cultural artifact and present a digitized narrative.
1. A Little Bit of History
Following World War II, the Soviet airline Aeroflot wanted a modern airliner with a larger capacity. (Finlay, 2022) Determined to beat Boeing and Douglas to the production line amid the early days of the Cold War, the Tupolev Design Bureau took on the challenge for creating a more reliable airliner. Approximately 10,000 workers took part in the Tu-104 program and because of this, the plane took its first flight two months ahead of schedule. (Singh, 2021)
With a design based on the Soviet air force strategic bomber known as the “Badger,” but, with a wider fuselage, the Tu-104 could accommodate up to fifty passengers, two pilots, and one navigator. See Figure 1. The plane was equipped with two turbojet engines in the root of the wings, and kept the design of the Badger’s wings, engines, and tail surfaces. It was also fitted with a drag parachute to help the aircraft stop since most runways were too short to accommodate a larger airplane at this time. The Tu-104 was the only active jet airliner in the world from 1956-1958. (Hirsh, 2011)

Fig. 1. Two pilots and one navigator shown in the cockpit of the Tu-104 jetliner. The navigator sits below in a space known as the navigator nosecone. (Hirsh, 2011)
Since the Tupolev Tu-104 was built quickly, it was plagued with critical construction issues. The plane was known to suddenly pitch up violently and then stall before going into an irreversible nosedive. This was known as “The Grab” among pilots and aircrews. In fear of this stall, aircrew would make their descent at approximately 30 mph over the recommended landing speed. (Hirsh, 2021) Good thing there was a parachute attached!
An interesting feature of the Tupolev Tu-104 is the navigator’s nosecone. See Figure 2. The only jetliner that still retains the navigator position is Air Force One, but no commercial jet liners retain the navigator nosecone equipped with an overhead astrodome. It is truly a unique feature of the Tu-104. Planes during the early years of advancement could use onboard radios to communicate with the ground crew during takeoff and landing. However, radio had a limited distance and communication became impossible once the plane was several hundred miles away. Instead, the navigator used several manual ways to calculate their position. One way was through the overhead astrodome. The navigator would use a bubble sextant to calculate the aircraft's position relative to the sun, moon, or stars (Singh, 2022).

Fig. 2. Reference photo of the interior of the navigator nosecone. Depicts the relation of objects in the space (Navigator Station, 2021).
Problems with “The Grab” continued and was the cause of at least two accidents. Changes to the design were made and new landing procedures were put into place. There were many variations built from the Tu-104 and it inspired technological advancements in the global civil jet industry in the years to come. It also played a large part in bringing the Soviet Union population together: “Before World War II, there were 150 airports in the country, which were mostly bare fields with unsurfaced runways. However, as the 1960s got into full swing, Moscow itself had four airports that connected to more than 200 cities (Singh, 2021)”.
After a fatal crash in Moscow, it was discovered that “The Grab” was caused by a fundamental design flaw of the plane and the Tu-104 was retired from civilian service in 1979. While in service, the Tu-104 carried over 90 million passengers to their destinations (Finlay, 2022).

The fuselage of the Tupolev Tu-104 filled with passengers. (Hirsch, 2011)
2. A Picture
With little knowledge of planes at the start of this project, I knew at the very least what I was looking at was beautiful. See Figure 3. This photograph had one foot in the future and one in the past, and it captured my imagination. Through an artistic lens, this photograph demonstrates how nature and time can crumble a technological advancement. It links two very different phenomena; mankind’s strive forward and nature’s way of taking it back. These two opposing forces are joined in this photo in harmony, creating beautifully worn textures and a space that appeals to adventure and science fiction.
From this photograph, I saw the opportunity to help share the history of the Tupolev and recreate a space that many will never see in their lifetime. Digitizing historical objects has become a new way to bring attention to extinct or lost environments. Creating an additional element of narrative can also add depth to the history and enhance the viewer experience. This project aims to create interest in a piece of aeronautical history while showcasing the time-worn structure.
Gathering reference images proved difficult for the Tupolev Tu-104. There are no available manuals in print or online. Modern pilots have little knowledge of the interior which I was creating: the navigator’s nosecone and its contents. My research owes a debt of gratitude to the work of Maria Karmanova. This plane which was once a mark of progress now lies rusting away in an old airfield in Berdsk, Russia. Maria took it
upon herself to attempt to bring the plane back to working order and has been restoring the plane piece by piece. During her reconstruction, she created an online journal from which I have gathered most of my reference photos.

Fig. 3. Original photo showcasing the navigator nosecone of the Tuploev Tu-104. (Antony, n.d.)
3. Workflow
3.1 Summation of Software Used
This paragraph is used to give a brief description of the software used and how it relates to this project. It is not an all-inclusive description of the capabilities and breadth of each software. The majority of the elements were created through different features of Autodesk Maya. Commonly shortened to just Maya, it is a professional 3D animation, modeling, simulation, and rendering toolset used for creating animated movies, TV series, and visual effects. For this project, it is where the majority of models, lights, and camera work exist and were created.
Pixologic Zbrush is a digital sculpting tool that mimics traditional sculpting techniques. It is often used for organic and detailed models and offers creative freedom through a large use of tools.
Produced by Pixar, Renderman is a plugin within Maya. RenderMan describes the geometry of the scene, how it is to be shaded, the light source descriptions, and the specifications of any virtual cameras. RenderMan allows for realistic textures and materials and uses the 3D scene description information to produce the final 2D images for either a static image or video.
Adobe Surface Painter is a very powerful painting tool with the main purpose of texturing models. It contains tools for procedural texturing and can be likened to a 3d version of Adobe Photoshop. Surface Painter also has the feature of baking tools which allows high poly detail to be baked on a low poly mesh. Low poly is an object or polygonal mesh in computer graphics that has a small number of polygons. High poly is an object with a larger number of polygons and with denser meshes and more detail. Substance Painter will generate a normal map based on the bake which effects how light reacts to the model and can help increase performance for dense scenes.
For digital effects and compositing, I chose to use the node-based software Nuke. Nuke has a robust toolkit for technical and creative controls and supports easy color management for consistent color.
Adobe Premiere Pro is a timeline-based software designed for editing in post-production. Adobe Premiere Pro allows for easy assembly of both audio and video. It has an array of features including audio and video effects, title and text creation, color manipulation, and many other toolsets that help finesse a final video. Adobe Premiere also allows the user to export in multiple file formats.
3.2 Modeling
The few photographs I was able to gather of the Tupolev Tu-104 equipment are displayed throughout this paper and were the principal references for the construction of the interior. The main challenge for modeling came from the lack of dimensions provided for any of the interior panels, navigation controls, or equipment. The photographs are taken from different perspectives, angles, and points in time. Due to the space limitations of the navigator’s nose cone, many of the elements or surfaces are not visible. Taking this into account as I worked was paramount in creating a comparative digital model. I chose to use two main points of reference to initially limit and accurately portray the space: the shell of the aircraft and the bombardier’s chair.
Using Maya to import the orthographic views of the plane in Figure 4A, I was able to re-construct the navigator’s nosecone to the proper dimensions as shown in Figure 4B. This shell served as a base scale for the interior of the nosecone and helped define the space. I then used further photographs as reference for a more detailed model of the shell as shown in Figure 4C.

Fig. 4. Figure 4A: Orthographic drawings of the Tupolev Tu-104. Aerial, Side, and Front views. (Tupolev, n.d.) Figure 4B shows a first pass screenshot of modeling the Tupolev shell within Maya. A more detailed pass still retaining the dimensions of the nosecone shell while including the astrodome and interior paneling is shown in Figure 4C.
I strategically chose to model the bombardier’s chair second because there are set standards for chair heights and more abundant modern references for navigator’s chairs. See Figure 5.

Fig. 5. From left to right. A schematic depicting the standard height of a chair in inches (Fig 5A) . A modern example of a pilot’s seat(5B). A render of my final model of the bombardier chair using a combination of measurements from 5A, the reference image 5B and original photograph Fig 3. (5C)
Using these two points as the framework for my digital interior, I was able to create the panels and equipment relative to the size of the chair and the nosecone shell. Using reference photos, I was able to approximate the geometry of the navigator panels and larger equipment as shown in Figure 6.

Fig. 6. A final render of my assets: Navigator Control Panels, AC equipment and main gauges. All were created within Maya and were approximated based on multiple reference photos and how they fit into the limited space of the nosecone.
Figure 7 shows a render of all low poly assets in place.

Fig. 7. Full render of all objects positioned in the space of the nosecone. Assets have standard surfacing applied. For a video render of the space with lighting in place, please use the QR code to the right.
Video render of preliminary lighting.
There are some instances in recreating the equipment where approximations had to be made. Although I strove to provide a true replica of the original plane, without proper dimensions, scans, or orthographic schematics, the recreation is only accurate to the original photo. All of this considers errors in having multiple photographs from different perspectives and angles which can affect dimension and shape.
There are some artistic licenses taken for incomplete or missing information. For instance, it is not clear how the hose labeled in Figure 8 is attached to other equipment. Logically, this hose cannot float in midair and knowing that my camera would be able to see that the hose was not attached, I created a space for the hose. The new box is an amalgam of existing equipment and the hose that was in view. See Figure 8.

Fig. 8. The arrow indicates the hose where missing information was interpreted and added. An iteration of the available equipment was used to provide a space for the hose to feel attached to the main controls as shown in Fig 7. (Karmanova, 2015)
I think it is important to recognize that this is an iteration of the equipment available, but not a true functional representation of the plane. There is precedent for taking historical spaces and embellishing them for the purpose of symbolism, function, and aesthetic appeal. One such example is the computer game Assassin’s Creed and their take on Renaissance Italy. In this recreation, embellishments were made to the city layout, gardens, and architecture. However, these additions kept in line with historical precedents and used symbolism and narrative to add intrigue to the game (Dwiar, 2017). These digital representations serve to not only enhance the viewer’s experience but bring accessibility to historical objects. In the reproduction of the Tupolev interior, the addition of detailed characteristics brought a sense of function to the artwork and enhanced the believability of the space.
With all low-poly assets created, there was the daunting task of UV-unwrapping assets. UV unwrapping is the process of making flat representations of models so that textures can be applied effectively. See Figure 9.

Fig. 9. An example of UV unwrapping within Maya. This is the UV layout of the metal portions of the bombardier chair.
This is a painstaking, necessary process in order to move on to texturing in Substance Painter. Due to the intricacies and amount, I allowed two weeks in my project timeline to manually unwrap all models. I used multiple UV tiles in unwrapping to get the sharpest resolution possible.
After this process, I moved on to hi-poly modelling of the acoustic paneling. The material of the nosecone is insulation made for high altitudes. In normal circumstances it would sit in between the paneling and exterior shell of the plane. In my recreation of the photograph, this material is exposed. I chose to recreate the fabric in ZBrush because the thickness of the padding and the lines of the fabric are not easily replicated in Maya or low poly planes. See Figure 10 for a screenshot of the user interface of Zbrush. I also chose ZBrush based on my background as a woodworker. With this software, I had complete control of the lines and thickness of the fabric. ZBrush also gives an artist a sense of the tactile feel of sculpting. Creating this portion of the plane gave me more freedom with the geometry and a true sense of ownership over modeling. I think this creative license would have been lost if approached from a procedural method like that done through Houdini.
Fig. 10. Video capture of ZBrush showing the walls in mid-sculpt. ZBrush is a digital sculpting tool that is often used for high resolution modeling. For a short timelapse of the process, please scan the QR code to the right.
3.2 Lighting
Lighting plays a huge part in creating tone in a scene. Being able to see and interpret where the light sources of a scene originate can be difficult, however, I had great reference for light from my original photograph. Lighting of the metallic surfaces is what initially drew me into the evocative nature of this environment, and I hope that I was able to capture a part of that brilliance within my recreation. I created directional lights within Maya representative of natural and artificial light sources: environmental factors and the unseen camera flash. I chose not to create a dome light or use an HDRI map for lighting because I wanted to be able pin my light to specific directions. I wasn’t too concerned about ambient lighting for my exterior, as long as the light appeared to come in naturally from both the plexiglass nose and overhead astrodome. This also allowed me a bit more freedom in choosing and editing the photo that was to be my background scene of trees and landscape.
I opted to use flags in my scene. Flags are polygon planes that serve to block light from specific areas of a scene. I used three flags, shown in green in Figure 11, to prevent light reaching beyond the boundaries of my nosecone shell and creating an overexposed background: one on each side and one acting as an extension of the overhead. These acted as a funnel, directing light forward.

Fig. 11. A screenshot of Maya viewport showing all lighting in the scene. The directional lights are shown in red boxes. The planes in green are the Flags that are placed to intentionally direct and block light.
It is important to note that lights were in place before texturing and tweaked throughout the process to give the best results. In Figure 12, I show what the lighting looks like when each set is turned on independently of the others. I have lights that simulate camera flash and those that simulate natural light that exist outside of the plane. I also added supplementary directional lights to further emphasize the specular reflectance of the deck, the brightness of bloom from the main window, and the highlight on the bombardier seat.

Fig. 12. All images are final renders with texturing within Maya. My lighting was grouped into three categories: camera (12A), daylight(12B) and additional lighting(12C). These renders show each source in isolation. 12C are artistic lights to showcase and emphasize bloom, increase specularity, or to boost light saturation.
3.3 Surfacing & Aces
To improve cache performance in Substance Painter, I broke my scene into separate sections: AC equipment, control panels, acoustic paneling, deck, bombardier chair, and nosecone windscreen. Each section was imported into Substance Painter (SP) and then using procedural shading, layers, and a variety of painting techniques, each asset was surfaced in steps. Reference photos proved a critical part of my look development for this part of the project. Although I have the workflow listed below, this may not be the order in which each artist tackles surfacing.
Step 1: Baking Maps & Color Management
I specifically add this to my workflow steps to bring it the attention it deserves. It is important to always bake maps. Baking is the process of saving information from a 3D mesh and generating a texture file. Baking also refers to the transfer of texture data from one mesh to another. This usually occurs from a high poly mesh to a low poly mesh to transfer details without adding additional polygons. Baking may only need to be addressed once, but any UV unwrapping or model revisions will require a new bake. Along with baking, it is important to set the project settings to the correct color workflow. This can be done by activating the color profile in display settings. I used an ACES workflow for a greater hue and saturation range.
Step 2: Normal Details (Normal Map)
Additional normal details within the model can be added in SP. Getting your model fleshed out in this step allows for easier manipulation of micro normal and micro height within SP and more efficient workflows within Maya. Doing this early in my process allowed me to set up the necessary anchor points to affect grunge maps in subsequent layers.
Step 3: Color Variation (Diffuse Map)
While developing any environment or character, a good base is imperative. Using reference and color theory, getting variation in color on an asset can create more realistic textures. Layering procedural textures can also break up solids and create depth. Nothing in real life is perfect and no object is one solid color!
Step 4: Adding Variation and Details (Specular and Roughness Maps)
As I worked, I paid particular attention to roughness maps in my models. Working with a variety of material types including aluminum, painted metals, cloth, dirt, leather, and glass, requires an understanding of how light scatters across these surfaces. Understanding material properties and roughness maps helps drive the level of degradation and realism of the plane.
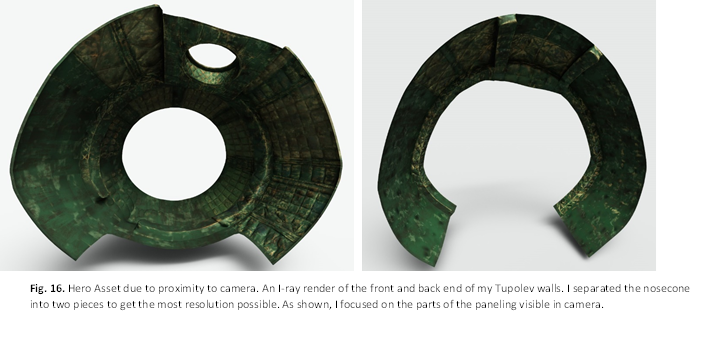
Step 5: Hero Asset Detailing
Hero Assets are those that are important in a scene or will be viewed in greater detail. These assets need additional attention since they will most likely be the closest to camera, and need a higher level of resolution. My hero assets were based on layout, and I therefore focused on the headsets, chair, and Tupolev acoustic paneling.
From “Rough to Fine!” as my mentor Jay Jackson would say. Each asset was “brought up together” as a whole scene to see how surfaces interacted within the space. It is important to see how all objects relate to each other in hue and value.
I used ACES workflow for this project. The Academy Color Encoding System (ACES) is a color management and image interchange system designed for production. It allows for a larger range of hues and brightness values that more closely match what the human eye can see. It also allows for more calibrated images throughout the production pipeline (Bailey, B., & Ben, S. , 2020).
Please see Figure 13 which shows a diagram of the range of colors ACES can encode in comparison to Rec. 709. The ACES workflow needs to be consistent between Maya, Substance Painter, Renderman and Nuke.

Fig. 13. ACES color space encompasses all the colors humans can see, dwarfing the range of colors Rec. 709 is capable of encoding. (Bailey, B., & Ben, S., 2020).
One of the biggest challenges of surfacing came from the acoustic paneling. Baking the hi-poly walls into the low-poly mesh initially caused stretching of the normal maps which became evident in Maya. I discovered that since the cage distance for baking, known as the max frontal distance, was too far out from the low poly mesh, the calculations for baking were not as accurate. This led to the distortions in the normal map. To fix this issue, I increased my poly count of my low poly mesh by subdividing by two. I then reimported into Substance Painter and re-baked maps. I learned that there is a limit to low poly models and that more divisions are needed to support higher detailed maps.
I learned new processes throughout this project. One of which was adding displacement to my assets using the PxrDisplace node. When setting up a shader, the bump map can create fake height with light manipulation, but the displacement map creates actual height in your object and affects shape. Exporting height as a 32 bit map from Substance Painter linearizes the maps and forces black to be the zero point of displacement. This allows for easier node connections within Maya and a smoother workflow.
As I brought up my assets, I realized that in order to bring more interest to the scene, I needed an additional element. I modeled a 1950s pilot headset very late in my workflow to add a human element to the story. See Figure 14. This would become a Hero asset and would also affect my camera work later in the process.
There are some artistic liberties taken with the level of surfacing for each asset. One example is the weathering on the bombardier’s chair. In order to create a surface that wasn’t overly busy, but still within the realm of realism, I used the artistic rule of threes to create a distressed pattern on the seat of the chair: One big, one medium, and one small as shown in Figure 15. This contrasts with the original chair which shows much more wear and tear along the edge and seat. I have included I-ray renders of my assets in Figures 14 through Figure 19 with a brief description of each.


3.4 Cameras, Nuke, and ACES
I spent quite a bit of time working on layout and finding how to best showcase the space visually. I chose to tackle this part in two different ways. Firstly, in the perspective of my original reference photo. Since most of my texturing, modeling, and layout came from that original perspective, I thought the best way to feel a part of that scene was as the photographer. The photograph had an initial compelling layout and using a vertical resolution gate, I was able to frame all the pieces together. This really helped me to capture the Tupolev Tu-104’s overhead navigator astrodome, the chair, and the deterioration of the deck all at once. Admittedly, one of the drawbacks of the odd aspect ratio was very long render times.
The second method of my camera work was twofold: narrative, while still allowing the historical aspects of the original reference to shine. Using a more standard HD1080 resolution, these two shots are more cinematic in nature. I added the human element of the headsets in one shot, and unveiled the entire space with the second.
All three of these shots were rendered in Renderman and composited in Nuke.
Since Maya’s Renderman outputs a linear EXR for all renders, it is necessary to convert these to ACES within Nuke. This can be done in the Project Settings tab as shown in Figure 20 using the OCIO config drop down.

Fig 20. In order to convert to ACES within Nuke, navigate to your project Settings by typing S while hovering over the Node graph. Under the Color tab, change the OCIO dropdown to aces_1.2.
Working within Nuke, I was able to color correct as needed and create supplementary lighting. Although not an element in the original photograph, I decided to create God ray’s shining through the overhead astrodome. I wanted to draw attention to the navigator’s dome and convey a sense of calm and wonder through the use of light. To create this element, I used a volumetric ray controlled by a radial node within Nuke. I animated the radial and volumetric nodes to work alongside my camera pan so that the light would remain emanating from the astrodome. Figure 21 shows the node network within Nuke used to color correct to ACES and create the volumetric rays. The renders were then exported as JPEGs and edited in Adobe Premiere Pro to produce the final videos.

Fig 21. My node network within in Nuke. Used to color correct my images and create the animated volume rays through the navigator port window. (Figure 21A) A visual presentation of the god rays that were created using the node network. (Figure 21B)
4. Conclusion
An object like a 1950s-era Tupolev Tu-104 bomber plane is not readily accessible to current researchers in the United States. There are no accessible manuals and very few photographs. Only two planes are available for public viewing, both of which are in Russia. There is little likelihood of us visiting such a rare piece of history. Heritage objects contain a cultural context that can become lost even in modern times. It is important for digital artists to contribute in preserving this history.
Using the traditional animation pipeline, I created two different videos. One captures the environment as the original photographer intended. The vertical aspect ratio captures the compelling nature of the environment as a whole and depicts how each piece relates to another. See Figure 22.
The second is more cinematic in nature. The HD1080 will easily port to a tv screen or monitor and is the traditional resolution for production. In this video, I attempted to add an artistic flair through the camera choices. The movement of the camera allows the environment to unfold for the audience, adding a bit more drama and narrative appeal. See Figure 23.
I believe both videos have a place in the digital preservation of heritage objects and digital storytelling. The digital recreation of the Tupolev Tu-104 can help create an immersive experience for a whole new audience. Hopefully these videos inspire others to digitally explore inaccessible places and learn more about the history behind those historical objects.

Fig 22. Final render of the video with vertical aspect ratio of 2048X2800. True to the original reference photo, the video captures the complete interior.

Fig 23. Final render of the HD1080 video of the Tupolev Tu-104. More narrative in nature, the interior is slowly unveiled to the audience.


Comments